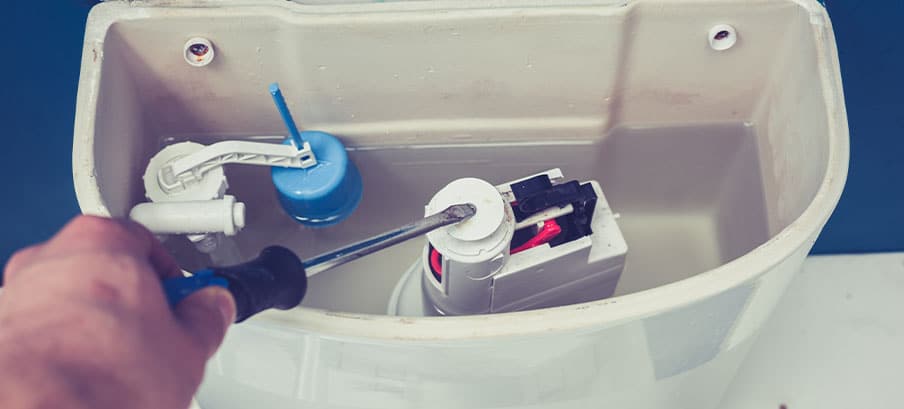
If you have a push-button toilet, you will have a flush valve inside the toilet cistern they work by lifting the mechanism to allow the water to flow into the toilet pan once the toilet is flushed.
Table of Contents
How To Change A Toilet Flush Valve For Push-Button Toilets
- Turn off the water supply
- Disconnect water supply on toilet cistern fill valve
- Undo the wing nuts holding the toilet cistern to the toilet pan
- Removed toilet cistern from the toilet pan
- Unscrew the retaining back nut holding the flush valve to the bottom of the toilet cistern
- Remove the flush valve from the toilet cistern
- Insert the new flush valve into the toilet cistern
- Tighten the flush valve retaining nut to the toilet cistern
- Place the toilet cistern back onto the toilet pan
- Tighten up the wing nuts holding the toilet cistern to the toilet pan
- Connect the water supply pipe back onto the toilet fill valve
- Turn on the water supply
As a plumber myself of over 20 years, I have changed thousands of different types of toilet flush valves, therefore, I can guide you through the simple task of changing a push-button flush valve on your toilet.
How Much Does It Cost To Replace A Push-Button Flush Valve?
If you were to contact a qualified plumber to change a push-button flush valve on a toilet, it would cost between £80 and £100 plus the cost of the push-button flush valve which will cost between £16 and £45
The most expensive flush valves are on the toilets that are hidden behind tiled walls.
If you were to change a push-button flush valve yourself, you would need the right tools and some simple knowledge of DIY plus the flush valve.
If your toilet is not behind a wall, then the best flush valve for you would be the Fluidmaster Pro550UK Dual Flush, this push-button flush valve comes with a cable that’s connected to a push-button; therefore, it will fit most push-button toilets.

If you have a toilet cistern that is hidden behind a wall can be much more problematic as the flush valve is more pacific and you will be required to replace the flush valve from the same brand of the toilet cistern.
Where To Find The Toilet Cistern Brand? Can Sometimes Be Quite Tricky
If you have a large plate on the wall with two push-buttons, then the name will be behind the chrome plate as well as the part number that you will require to gain to remove the wall plate simply push the wall plate to one side and lift to remove the plate.
Which Is The Best Push-Button Flush Valves
I have put together the five best push-button flush valves, from many years of experience in carrying out plumbing work.
- Fluidmaster Pro550UK Dual Flush
- Geberit Ideal Standard Twin Flush
- Macdee Dual Flush
- Wirquin Universal Flush
- Siamp Optima 49 Dual Flush
All of the above push-button flush valves are for a toilet that is not hidden behind a tiled wall.
If you have a toilet that is hidden inside a toilet unit, then I would recommend the Fluidmaster Pro550UK Duel Flush push-button valve.
For a more comprehensive look into the best flush valves, you can read this guide for more information.
When Should Your Toilet Flush Valve Be Replaced?
There are a couple of different reasons you will need to replace the toilet flush valve.
- The water keeps running
- The toilet won’t flush
- Push-button is stuck
Whatever the reason is for changing the push-button flush valve, this guide will help you through the simple process of how to change a push-button flush valve.
Tools And Materials Required
Tools
- Small Spanner
- Adjustable grips
- Flathead or posy screwdriver
- Stanley blade
Materials
- Toilet flush valve
- Close couple kit
Or
- Cistern Bolts
- Fibre washer
How Can I Tell If I Need A Close Couple Kit Or Cistern Bolts?
Once you have removed the cistern lid, all you need to do is look inside the cistern, and if you see screw heads at the bottom of the cistern you will need cistern bolts, if you don’t, you will need a close couple kit.
Ok let us get started
First, you will need to start by removing the toilet cistern lid; now there are many different ways to do this as some push-buttons will lock the cistern lid down to the flush valve, and most buttons will allow you to lift the cistern lid however if you can’t just lift then you may have to unscrew the button by turning it anticlockwise.
Please note if you button says idea standard then you will need to follow on below.
Idea standard push button, you should know if your toilet is an ideal standard by looking at the button as they may have their name printed onto the button.
For this type of button, you will need to push down the larger button and then pull up the smaller button this then allows you to remove the larger button, underneath you will find a small screw, which you will need to unscrew before the lifting of the toilet cistern lid.
Turn off the water supply
The water to a toilet can either be from the cold mains or the cold-water tank.
If you have an isolation valve on the water feed to the toilet, you’re in luck as you will not need to turn off the water to your property or drain down a cold-water tank.
If you have an isolation valve on the water feed to the toilet fill valve simply turn the screw on the front of the isolation valve so that the screw head is across the pipe.

If the toilet's water feed is from the cold-water tank, you will need to either drain down the cold-water tank or isolate it from a gate valve.
In my opinion, it is easier to drain down the cold-water tank than to turn off a gate valve unless the gate valve is new.
Here are two different types of valves
Gate Valve
Lever Valve


If you don’t have an isolation valve on the water supply to the toilet fill valve, don’t worry, I will quickly explain how to drain the water from your cold-water storage tank.
For the full guide on how to drain down hot and cold-water storage tanks click here.
Drain A Cold-Water Storage Tank
To drain down, you will need to turn off the mains water supply which can usually be found under your kitchen.
If you can’t find the mains stop valve under your kitchen sink, I listed a couple of more locations below.
- In your downstairs toilet.
- In a Hallway cupboard or under the stairs.
- In some property’s older properties under the floorboard by the front door.
You should have an outside shut-off valve, in most newer style properties you most likely have a water meter or a modern water shut-off valve, these are typically located just outside your property or on your driveway/footpath.
Once you have turned off the water, simply turn on every hot and cold tap in your property until the water stops.
To make sure you have drained down thoroughly flush the toilet and make sure it doesn’t refill.
Great now we can start to change the toilet float valve!
To remove the water from the toilet cistern, you will need to Flush the toilet and remove any residual water from the toilet cistern.
To remove the residual water from the toilet cistern, you can do this with a sponge or a cloth if you have a wet vacuum, you can also use that to remove the water faster.
Disconnect Water Supply On Toilet Cistern Fill Valve
Now you need to locate the brass or chrome back nut under the toilet cistern where the water inlet pipe joins the toilet fill valve thread now undo the water feed pipe to the toilet fill valve.
You will need to put a cloth around the copper pipe on the floor, if you can place a pot under the copper tube then do that, this is to catch any excess water.
Now you're ready to start discounting the cold-water supply; you will need to use your adjustable grips to hold the plastic toilet fill valve thread under the toilet cistern.
Be careful you don’t damage the plastic threads, now using your small spanner you can undo the brass or chrome back nut turning the back nut anticlockwise.
Using a spanned now undo the retaining nut that holds the fill valve in place this will most likely be a plastic nut that is holding the fill valve onto the bottom of the toilet cistern, then remove the float valve from the toilet cistern.
Using a small screwdriver or small blade, you will need to remove the red washer from the top of the copper pipe fitting this is called a fibre washer, if you don’t replace the fibre washer, you will get a leak.
Undo The Wing Nuts Holding The Toilet Cistern To The Toilet Pan
Now you can start to unscrew the toilet cistern from the wall with your flat head or posy screwdriver.
Now underneath the back of the toilet, you will find two wing-type nuts, you will need to undo them one at a time to undo them.
If you have water coming out, don’t worry, it’s just water that is sitting between the cistern and the toilet pan.
The wing nut can sometimes get stuck, but if they do you will need to spray them with WD40 or grease.
If after spraying with WD40 or grease you are still unable to undo the wing nut you will need to cut them off.
Using a junior hacksaw, place the blade against the back of the toilet pan just above the wing nut and start cutting – go slowly so that you don’t damage the toilet.
Removed Toilet Cistern From The Toilet Pan
Now you have fully discounted the toilet cistern you can lift the cistern off the toilet pan base, pour any excess water into the toilet bowl and place the cistern onto the toilet base.
Not on top of the toilet seat as they are level and could fall off.
Unscrew The Retaining Back nut Holding The Flush Valve To The Bottom Of The Toilet Cistern
Once you have the toilet cistern off remove the large black washer if it is still attached to the toilet cistern then using a adjust grips or spanner start to unscrew the large plastic retaining back nut that is holding the flush valve onto the toilet cistern.
Remove the close-coupled metal bar from the threads on the flush valve then remove the flush valve from the toilet cistern then clean around the base of the toilet cistern to make sure you have removed any debris.
Insert The New Flush Valve Into The Toilet Cistern
First, you will most likely have two different size washers in the toilet flush valve box these are for different size holes inside your cistern these are.
- 1” ½
- 2”
The 1” ½ washer is a flat washer and the 2” washer is a cone shape.
Place the required washer into the flush valve threads and insert the flush valve into the cistern and through the hole at the bottom.


For Close Couple kit toilets only
Insert the close couple kit over the flush valve threads so that the close-coupled plate is sitting against the bottom of the toilet cistern on the outside.
Then start to tighten the flush valve retaining nut to the toilet cistern making sure the flush valve doesn’t move, and the close couple kit is straight.
You will then need to place the large doughnut/ring washer onto the back of the toilet base in the marked groves then put the bolts into the cutouts on the close couple plate.
For Cistern bolts toilets only
Now insert the cistern bolt into the inside of the toilet cistern making sure you have the following combination.
- Metal washer, then
- Rubber cone washer
Once push through the cistern now you will need to put a metal washer onto the thread then the little bolt, now you're ready to put the cistern onto the base of the toilet.
Slowly place the toilet cistern back onto the toilet pan base, making sure to doughnut washer is still in the same place.
Using the wing-type nuts secure the cistern down to the toilet base making sure you don’t over-tighten - the wing nut should only be hand-tight.
Connect The Water Supply Pipe Back Onto The Toilet Fill Valve
First, you will need to remove the red fibre washer on the cold-water supply pipe fitting and replace it, if you don’t you will get a leak.
Line up the float valve thread with the brass or chrome back nut and tighten using a small spanner, you will need to hold the plastic float valve thread when tightening the brass or chrome back nut.
Re-screw the toilet cistern back to the wall.
Changing The Push-Button
Remove the old push-button from the toilet cistern lid and clean it to remove any debris, insert the new push-button into the hole on the cistern lid.
If you have used the Fluidmaster Pro500UK Dual Flush toilet flush valve, then you can remove the large chrome sleeve from around the button so that the top of the button sits inside the cistern lid.

Now screw the large retaining back nut onto the push-button threads.

Push the clip onto the Push-button threads making sure it is secure by the retaining clip, place the cistern lid back onto the toilet cistern.

That’s it you all done; it’s time to turn on the water and test you work.
Turn On The Water Supply
You now should be good to start to turn on the water to the toilet,
First, turn off all taps that you have turned on and start to turn on the water supply.
If your toilet is on the main water supply
Turn on the mains water supply slowly so that you can hear the water coming through the pipes and check for leaks.
If your toilet is on a cold-water tank
Turn on the cold-water tank supply to allow the cold-water tank to refill, then check your work for leaks.
No leaks great!
Water supply
Now you can turn on the mains water supply slowly until it is fully open.
Always make sure when turning the water on the stop valve is fully open then turn the handle back ¼ turn, this will help the brass body of the valve stick to the jumper inside the main water stop valve.
Once you have refilled the toilet cistern leave the water sitting there without flushing the toilet for around five minutes to make sure you have not got a leak from the flush valve.
When you are ready to flush the toilet check for leaks
If your toilet is slow filling, you might want to change the toilet fill valve I have a guide for that here.
That’s it you're all done.