Outside taps can be a vital part of the home for many reasons, such as watering your garden or even washing your car. This is why I have put together this simple step-by-step guide on how to install an outside tap.
Table of Contents
The Simple Way For How To Install An Outside Tap
- Turn off the mains water supply
- Drill a 10mm pilot hole through the wall
- Drill a 16mm hole through the wall
- Insert the through-wall plate
- Fix the through wall plate to the outside wall
- Screw the outside tap onto the wall plate
- Connect up the plumbing to the main water supply
- Turn on the mains water supply
As a qualified plumber with over 20 years of experience, I will guide you through all the tools and materials you need and the best practices to get the job done right in the shortest amount of time.
Do You Need a Qualified Plumber To Install An Outside Tap?
Installing an outside tap to your house whether it's at the front or the back of your property should be reasonably straightforward for most people, all you need is the right tools and some practical knowledge of DIY.
How Long Will It Take To Install An Outside Tap?
Most qualified plumbers would complete this job within 1 hour, so you should allow yourself 2 hours; however, this will always depend on where the outside tap is going and the location of the main water supply.
How Much Does It Cost To Install An Outside Tap?
The cost for replacing an outside tap should be between £130 and £180 for a fresh installation. This price includes all labour and materials; this depends on whether the tap is fitted on the outside wall, where the kitchen sink is directly on the other side.
When fitting an outside tap where the kitchen sink is not directly on the other side of the wall, the price will most likely change and, therefore, between £200 and £300
Outside tap repairs or replacements, the price will be much lower, and therefore the price will be between £65 and £130, this is because of most plumbers on average throughout the UK will charge between £65 and £130 per hour.
Installing an outside tap yourself would ultimately be the cheaper option as the price will be between £30 and £50, depending on whether you have a drill and the other tools you will need to do the job.
You might want to consider your options to see if you have the right tools to do the job, such as a drill, which will be the most expensive tool you will need.
Do I need a Double-check Valve for a garden tap?
When installing a new garden tap, you must ensure you carry out the work due to the water regulations. The water regulations stipulate that you must have a non-return valve, such as a double check valve, installed to an outside tap to prevent backflow of water, which could contaminate the water mains.
Installing an isolation valve would not comply with a non-return valve; however, it would be a recommendation to install one so that you can turn off the water to the outside tap in the winter months.
Most outside taps nowadays come with a double-check valve built with the tap, so you don’t have to worry about installing a separate non-return valve.

I have compiled a list of tools and materials for you so you can cost out the job for yourself to see if you can install an outside tap yourself or if it would be cheaper to call a professional plumber.
Tools You Will Need To Complete This Job
- Drill
- 16mm Masonry drill bit
- 10mm Masonry drill bit
- Spanners
- Screwdriver
- Pipe cutter
Materials You Will Need To Complete This Job
- Through wall plate
- Double-check the valve outside the tap
- PTFE tape
- Electrical tape
- Compression or push-fit tee
- Compression or push-fit elbow
- 15mm isolation valve
- Wall plugs
Turn Off The Mains Water Supply
The first part of the job is locating your main water supply, commonly found under your kitchen sink.
Here is a picture of a mains water stop valve. I always get asked what a mains water stop valve looks like.

If you can't find the main water stop valve under your kitchen sink, I have more locations below.
- For some older properties, the main water stop valve can be found under the floorboards near the front door.
- If you have a downstairs toilet, the mains water stop valve can be in your downstairs toilet by the toilet.
- Sometimes, you may also find the main water stop valve on a board under the stairs.
Hopefully, you have located the main water supply shut-off valve now!
But if not don't worry.
You should have an outside shut-off valve. In most newer-style properties, you most likely have a water meter or a Morden water shut-off valve; these are typically located just outside your property or on your driveway/footpath.
Some outside water shut-off valves will require a stop valve key but don't worry, I have you covered, you can purchase them from many different retailers or plumber's merchants.
First, Lift the Lid to see which style you have. Some are square ends, and others are standard stop valve handles.
Here are both types for you.


There is also a third option. However, if you live in an old property, the key may not fit, but here is a link to one to see for yourself.
Duel head stop valve key

Just a quick note – never overturn or force any stop valves to shut off the water, or you could end up breaking the mains water stop valve or pipework.
If the main water stop valve doesn't turn, you can try putting boiling water onto the main water stop valve, and please be careful not to burn yourself, you can try WD40 or grease.
Which Pipe Should I Connect To When Installing My Outside Tap?
All outside taps should be connected to the mains water supply and not to any water feed from cold water tanks.
All kitchen sink taps will connect to the water mains; therefore, it is the best place to connect your outside tap.
You can take a quick test to ensure you have the mains water by putting your hand tightly over the tap spout, sealing it off, and slowly turning the tap on to see if water starts to spray out. You have the mains water supply.
If no water is spraying out, most likely have a cold-water feed from a cold-water tank. If you are still unsure, you can purchase a pressure tester to check.
Drill A 16mm Hole Through The Wall.
When you are ready to drill the hole through the wall, you will need to start with a smaller drill bit; first,, I recommend a 10mm drill bit.
We use a smaller drill bit first because if you drill straight through the wall from the inside out, you will most likely blow the wall out when the drill bit goes through the wall.
Using a smaller drill bit first means you can drill back through the wall from the outside in with the more significant drill bit, which will do a better job on the outside wall.
Insert The Through Wall Plate
When fitting the through wall plate, you will need to rap some electric tape around the end of the wall plate so that when you push the plate into the wall, you don't get any muck inside the fitting.
Push the through wall plate into the wall until the brass plate is against the outside wall, mark the three screw holes with a pencil, remove the through wall plate and drill the three holes with a smaller 6 -6.5mm drill bit.
Insert the wall plugs and then push the through-wall plate back through the 16mm hole again, fixing it with screws into the wall plugs.
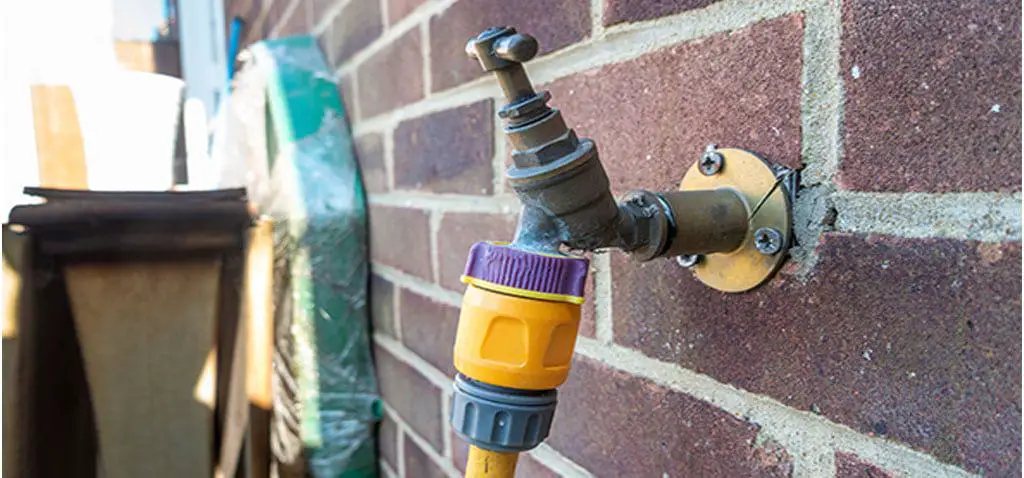
Screw The Outside Tap Onto The Through Wall Plate
Installing the outside tap onto the through wall plate, you will need to start by wrapping PTFE tape around the threads of the bottom of the outside tap.
The best way to wrap the PTFE tape is to hold the tap in your left hand and wrap the PFTE tape around the tap threads clockwise.
Wrap PTFE tape this way; the tape is then in the opposite direction to the threads, which will help when tightening the outside tap onto the through wall plate.
Once you have finished wrapping PTFE tape onto the thread of the outside tap, screw the tap onto the through-wall plate until the tap is hand-tight.
Using a spanner, just pinch the outside tap so that the tap is in the connect position.
Be sure never to over-tighten the outside tap onto the through wall plate; otherwise, you could damage the tap or the through wall plate.
If once you have tightened up the tap and the tap is not in the face-down position, then unscrew the tap and put a couple of more wraps of PTFE tape on the tap threads.
Connect Up The Plumbing To The Mains Water Supply
There are several ways to connect the plumbing to an outside tap.
Firstly, you have different types of fittings, such as
- Compression fittings
- Push-fit fittings
- Solder fittings
Secondly, you have outside tap plumbing kits.
These outside tap kits have all the parts you need to install the outside tap, including the plumbing.

The outside tap kit uses a water clap, which might look easier at first glance but comes with problems.
The water clap wraps around the water pipe, and as you clap the fitting onto the pipework, it pierces a small hole into the copper tube. This might sound great; however, they can leak and also get blocked.
The pipe that goes through the wall is normally plastic or a rubber hose, which is not good as it can leak or burst.
As a plumber myself, I would never recommend one of those kits as I know the problems plumbers have when they go wrong, such as removing them and installing the outside tap again.
You should still follow this guide, as the process is always the same whether you purchase the full outside tap kit or all the parts individually.
Most plumbers would most likely always use soldered fittings, but for this guide, compression fitting will be fine.
You can use either fitting, and it's entirely up to you. I will use compression for this example, as you will need to know how to tighten the isolation compression fitting anyway.
For this example, I will say the plumbing is under the kitchen sink, as this is the most common.
To start the plumbing, you will need to ensure you have turned off the water supply by turning on the cold side of the tap, and if you have more than one tap downstairs, turn it on. This will help remove the water from the pipes.
You will need a small container as there may still be a small amount of water in the pipework, but don't worry. If you have followed all the steps, you should be fine.
Which Pipe Is The Cold-Water
You can check which is hot and which is cold by looking up underneath the kitchen tap. The cold will most likely be on your right when looking up, as the hot water feed should always be on the left, but double-check before cutting any pipes.
Cutting The Pipes
You will need to cut the cold-water mains pipe with a pipe cutter

Now, you can connect your compression tee fitting between each of the cut ends of the pipe but do not tighten them yet.
Now measure and cut a 15mm copper tube to fit between the compression tee and the threw wall plate. Once the pipe has been cut, insert one end of the copper pipe into the compression tee and line it up to the through-wall plate – you may also need to cut it back a bit. If so, make sure you don't cut too much off.
Now cut the pipe you have just cut so that you can connect the isolation valve, then cut down the pipe to line up with the bottom of the threw wall plate again.
Now connect both the through wall plate and the cold-water pipe with a compression elbow.
That's it, we are nearly done.
How Tight Should Compression Fittings Be?
When tightening up compression fittings, most people overtighten. This is usually because they use a spanner that is too large for the job.
Using a small spanner, now tighten up each compression joint so that it is tight but not over-tight. If you get a small leak, you can always tighten it a bit more, but you would need to replace the pipe if you over-tighten it.
Turning On The Water Supply
First, turn off any taps that you have turned on. Now, you are ready to test your work.
Turn on the mains water supply slowly so that you can hear the water coming through the pipes, and check for leaks.
No leaks, great!
Now you can turn on the mains water supply slowly until it is fully open.
Always make sure when turning the water on the mains stop valve fully open, then turn the handle back ¼ turn, this will help the brass body of the mains stop valve stick to the jumper inside the mains water stop valve.
I have a small leak.
Don't worry. It's not uncommon, and even plumbers get leaks occasionally.
Turn off the water supply and double-check your work. The most common causes of leaks in compression fitting are:
- Needs a bit more tightening
- The pipework is not inside the fitting fully
- Faulty fitting
First, check that the compression fitting is tightened by slightly tightening a bit more.
Is it still leaking?
If yes then turn off the water supply and undo the fitting to check if the pipe has been pushed all the way in if it was then you might just have a faulty fitting, if not try to push it in and retighten.
Well done, you have finished installing an outside tap.
If you have the right tools and materials, anything is possible, and you need to take your time and double-check before doing anything.
Never overtighten compression fittings as you can always tighten them a bit more if you have a small leak.
The most important thing is don't worry if you leak. All plumbers in the time have had leaks, some small and some large, as things can occasionally go wrong.
Are you ready to take on installing an outside tap? I hope so.
For more Plumbing Diy how to guide and our homeowners maintenance guide